If you’re running a Synology NAS to host your website or other online services, you may be concerned about security and reliability. One solution to both of these problems is to use Cloudflare Tunnel. In this blog post, we’ll explain what Cloudflare Tunnel is and how to set it up using the Docker package on your Synology NAS.
What is Cloudflare Tunnel?
Cloudflare Tunnel is a service that allows you to securely expose your local web server to the internet. It creates a secure, encrypted connection between your web server and Cloudflare’s edge network. This means that your website is not directly exposed to the internet, which can help prevent attacks and increase reliability. With Cloudflare Tunnel, you can keep your website or other online services on your local network, while still making them accessible to the public.
The benefits of using Cloudflare Tunnel are numerous. For one, it can help protect your website from attacks, such as DDoS attacks or brute-force login attempts. Additionally, it can improve reliability by allowing you to keep your website or other services on your local network, where they may be more secure and easier to manage. Finally, it can help improve performance by using Cloudflare’s global network to deliver your content to users all over the world.
Setting up Cloudflare Tunnel on your Synology NAS using Docker
To set up Cloudflare Tunnel on your Synology NAS, you’ll need to use Docker. Docker is a platform that allows you to run applications in containers, which are isolated from the rest of your system. This makes it easier to manage and deploy applications, as well as to ensure that they are running securely.
Here are the steps to set up Cloudflare Tunnel using Docker on your Synology NAS:
Step 1: Install Docker
The first step is to install Docker on your Synology NAS. You can do this by opening the Package Center and searching for “Docker”. Once you’ve found it, click “Install” and wait for the installation to complete.
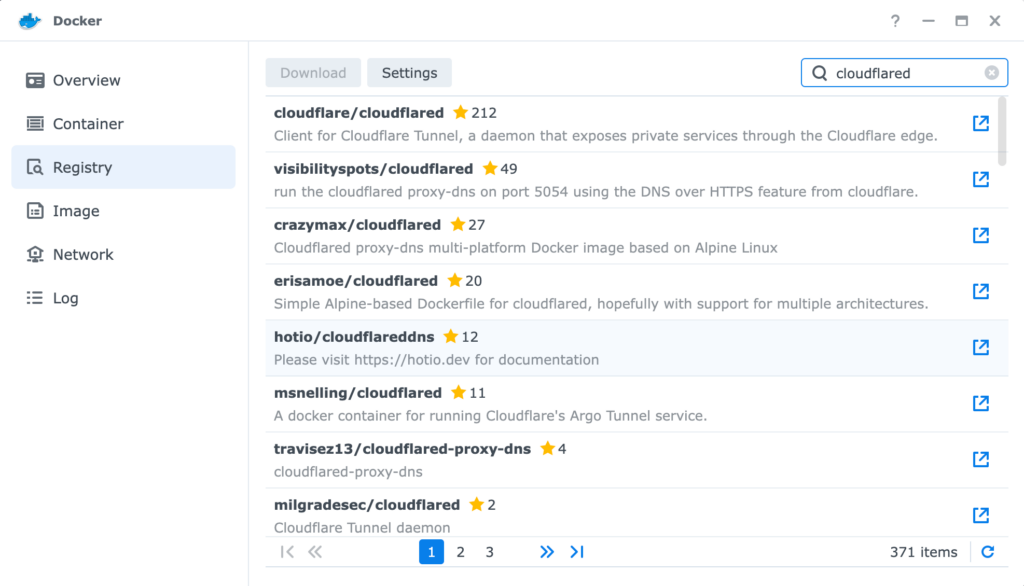
Step 2: Create a Docker container for Cloudflare Tunnel
The next step is to create a Docker container for Cloudflare Tunnel. To do this, you’ll need to use a Docker image that contains the Cloudflare Tunnel client. You can find a suitable image on Docker Hub, which is a repository of Docker images.
Open the Docker application and go to the “Registry” tab. Search for “cloudflare/cloudflared” and select the latest version. Click on “Download” to start the download process. If asked to choose a tag, the “latest” is fine.
Step 3: Configure Cloudflare Tunnel
Sign into your CloudFlare account and go into the Zero Trust dashboard.
From the dashboard, create a new tunnel by going to Access > Tunnels > Create Tunnel
Give your tunnel a unique name and then Save Tunnel.
Now that you’re in the tunnel configuration, choose Docker for your environment.
Scroll down and copy and paste the pre-written command into a text editor for use in the next steps.
Step 4: Run the Cloudflare Tunnel Docker container
Go to the Docker application, launch the cloudflared image.
Choose “Use the same network as Docker Host” for the network.
On the next screen, change the name from the default, check to Enable Auto-Restart then go into Advanced Settings.
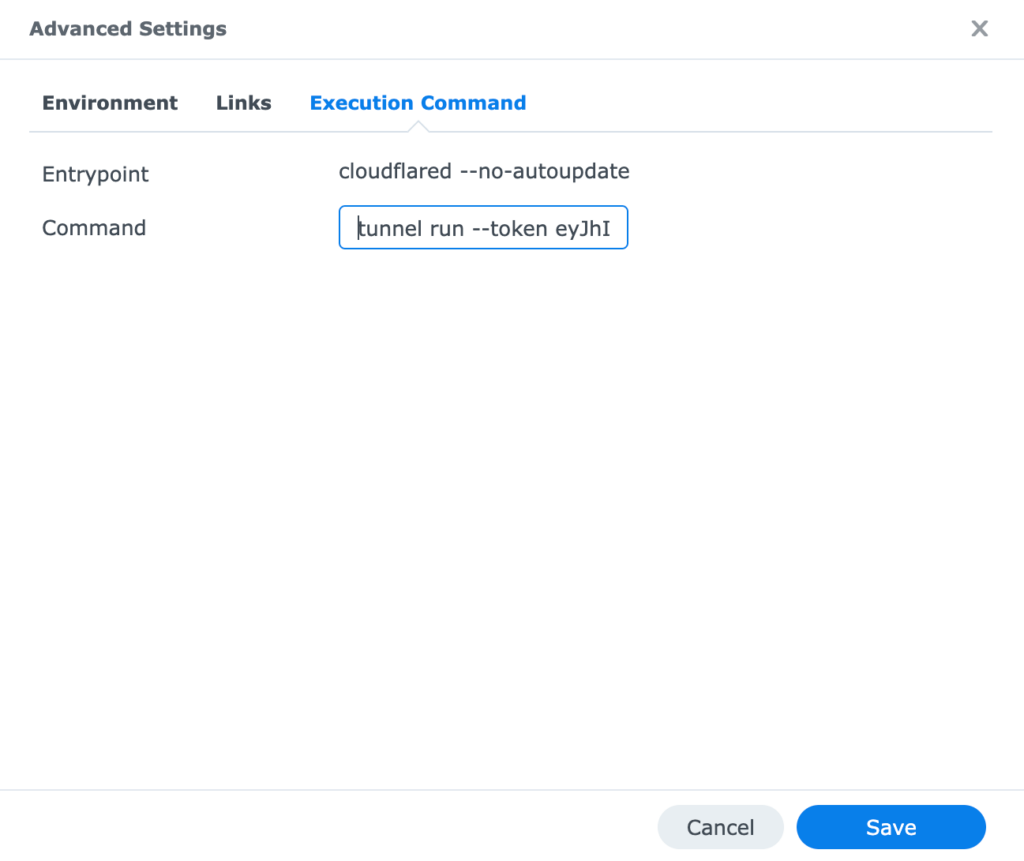
Tab over to the Execution Command.
Your execution command is the pre-written command copied to the text editor in step 3 but with some slight modification. All that is needed from that command is the following:
tunnel run –token <token>
Where <token> is is the long string of alpha-numeric characters.
S

Paste the command into the command field in the docker container advanced settings.
Save and click next.
There is no need to add any Volume Settings since this container is just setting up a tunnel.
Click Next and then Done.
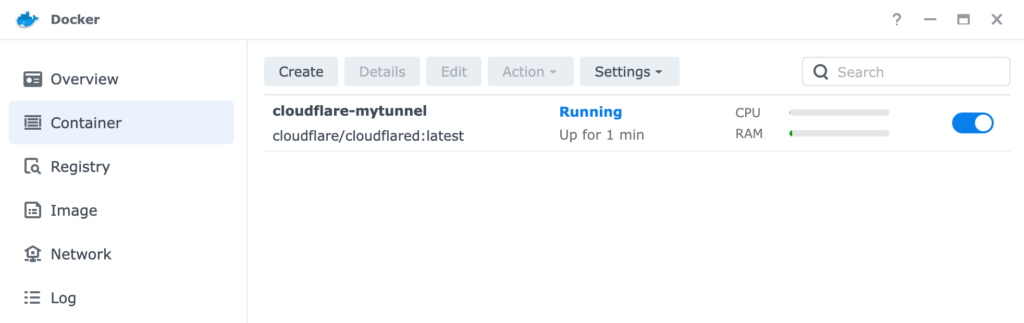
Step 5: Verify the Container is running
In the Docker app on Synology, go to the Container tab.
On the right side, you should see your new container and It should be running.
Step 6: Verify the tunnel is connected
Head back over to CloudFlare Zero Trust > Access > Tunnels
Find the tunnel you created in the list and verify that the status is healthy.
W
Step 7: Test your Cloudflare Tunnel
Once the Docker container is running, you can test your Cloudflare Tunnel by accessing your website from a different network. Enter your domain name in a web browser and verify that your website loads correctly.
Conclusion
Setting up Cloudflare Tunnel using Docker on your Synology NAS can help improve the security, reliability, and performance of your website or other online services. With Cloudflare Tunnel, you can keep your services on your local network, while still making them accessible to the public. By following the steps outlined in this blog post, you can easily set up Cloudflare Tunnel and start enjoying the benefits of a secure, reliable, and fast online presence.